To get ready, please review crevasse rescue z-pulley, and belay escape with all munter-mules, on your own. Rescue Methods will build on top of them.
To set expectations:
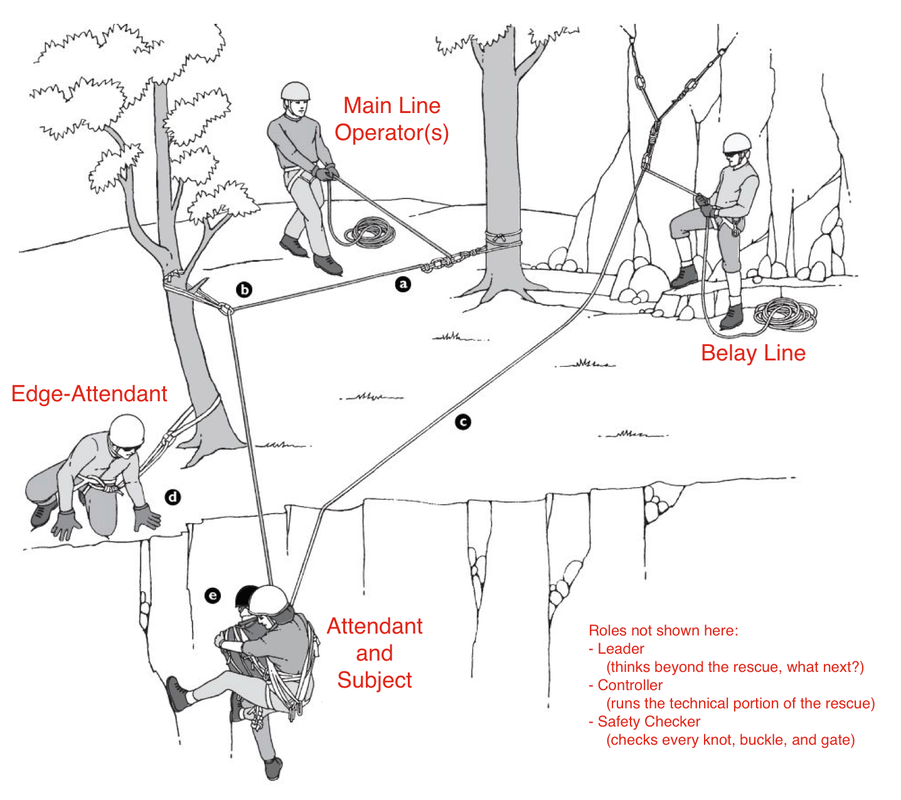
Rescue Methods, as taught at this point, focuses on large-group rescue, where 3 to 8 people are available to participate in the rescue. Half of what's needed to accomplish that are technical skills, for building various raising & lowering system. The other half are soft skills, to organize a group of 8 people into a single well-run rescue operation, as opposed to chaos (or 8 separate poorly-run rescue operations.) All of our practice-rescues will be performed from above the patient, but could be adapted to be run from the ground below as long as you can climb up and create some bomber top-rope anchors above the patient. All of our rescues will utilize two climbing ropes, referred to as a main-line and a belay-line, which I'll explain in more detail when we meet.
Practices
It's important that everyone learns and practices the technical skills (at the very least, the ones that will happen on the main-line) before coming to the official weekend field trips for Rescue Methods. How many practices you need may be different for every person, but as a recommended minimum, I'd say at least either two evening practices, or at least one full-day practice. More is better.
To set expectations:
Rescue Methods, as taught at this point, focuses on large-group rescue, where 3 to 8 people are available to participate in the rescue. Half of what's needed to accomplish that are technical skills, for building various raising & lowering system. The other half are soft skills, to organize a group of 8 people into a single well-run rescue operation, as opposed to chaos (or 8 separate poorly-run rescue operations.) All of our practice-rescues will be performed from above the patient, but could be adapted to be run from the ground below as long as you can climb up and create some bomber top-rope anchors above the patient. All of our rescues will utilize two climbing ropes, referred to as a main-line and a belay-line, which I'll explain in more detail when we meet.
Practices
It's important that everyone learns and practices the technical skills (at the very least, the ones that will happen on the main-line) before coming to the official weekend field trips for Rescue Methods. How many practices you need may be different for every person, but as a recommended minimum, I'd say at least either two evening practices, or at least one full-day practice. More is better.
New Gear to Buy
There's only one new thing you should buy for this: A really big piece of webbing. I'd recommend 17 feet of 1" webbing. We'll use it to build a wrap-3-pull-2 anchor. (For this field trip, please bring that big piece of webbing, it's cheap and it makes the FT easier & safer. Sure, you probably won't bring that webbing on normal climbs. While a cordelette is okay to use as a real-life rescue anchor in an emergency, a cordelette is just barely strong enough for the 2-person bouncing or otherwise force-multiplying loads that can happen in a rescue. Rather than make a habit of using an anchor that's just barely strong enough, we use wrap-3-pull-2 anchors during the field trip so that we have anchors with a hefty margin of extra strength while doing repeated practices.)
Gear Required
Please bring the following to my practice nights for this:
Things you don't need:
Soft Skills
I encourage you to think deeply about what I mean by each of these just before you go to the Rescue Methods FT weekend:
My Teaching Notes
These are my notes, reminding me what topics to cover and in what order. You don't have to read or understand any of this yet, but I'm putting it out there in case you're curious: https://www.dropbox.com/s/i2vz5xb9hx13va7/Rescue%20Methods%20Teaching%20Notes.rtf?dl=0
Also, here's a document Deling put together trying to explain some of the technical skills, but I'd recommend NOT reading it for now, these are a lot easier to understand when you see them done in person: https://onedrive.live.com/view.aspx?cid=03CCD771C4BCF932&resid=3CCD771C4BCF932%218713
Practice at home
This is a bit complicated, so if it doesn't make sense, don't worry and we'll practice it together at the clubhouse. But, if you can, try to build a load-releasing hitch (LRH) at home to get some practice ahead of time. You need a cordelette and two lockers, at least one big enough for a munter hitch. Here's a video: https://www.youtube.com/watch?v=mvMU_fLJwqY
There's only one new thing you should buy for this: A really big piece of webbing. I'd recommend 17 feet of 1" webbing. We'll use it to build a wrap-3-pull-2 anchor. (For this field trip, please bring that big piece of webbing, it's cheap and it makes the FT easier & safer. Sure, you probably won't bring that webbing on normal climbs. While a cordelette is okay to use as a real-life rescue anchor in an emergency, a cordelette is just barely strong enough for the 2-person bouncing or otherwise force-multiplying loads that can happen in a rescue. Rather than make a habit of using an anchor that's just barely strong enough, we use wrap-3-pull-2 anchors during the field trip so that we have anchors with a hefty margin of extra strength while doing repeated practices.)
Gear Required
Please bring the following to my practice nights for this:
- That one really big piece of webbing.
- Harness. When it comes to the weekend FT, bring your comfiest one, if you own more than one. You'll get to free-hang in it for 20 minutes straight :)
- Anything you'd normally have on your harness for a rock or glacier climb, like…
- Belay device & belay gloves
- A bunch of lockers, like 5 or 6. At least 3 of them should be wide enough for munter-hitches.
- At least 5 regular carabiners as well.
- A few runners, perhaps 2 singles and 2 doubles.
- A cordelette (very important.) Better yet, bring two cordelettes if you can.
- Prusiks: both a hero loop or two, and your texas-prusik set from glacier travel.
- Pulley, your prusik-minding one from basic crevasse rescue. (This one works well with it's wide "shoulders.") If you happen to own a 2nd pulley, bring that too, it'll help.
- Helmets are optional for my evening Rescue Methods practices, but essential at the weekend FT outside. We'll stick to inside the basement and won't really be climbing, so they're not required, but you're always welcome to wear one anyway if you'd like.
Things you don't need:
- Rock shoes. Mountaineering boots are a good idea on the weekend FT, but in our basement practice sessions, any regular street shoe is fine.
- Pro. Nuts, cams, pickets, & ice screws can all stay at home for this. In the basement, we'll use existing anchor points. On the official weekend FT, we'll use trees as anchors. Building other anchor types is covered in Ropes & Anchors, and in Rock 1, and we don't have time to talk more about anchors during Rescue Methods.
- Ropes. We'll use club ropes.
- Ice axe or crampons.
Soft Skills
I encourage you to think deeply about what I mean by each of these just before you go to the Rescue Methods FT weekend:
- Avoid too many cooks in the kitchen. There's more than one right way to do things, and odds are the person giving you advice is thinking of a different-right-way than you are.
- Establish who amongst the main-line operators will be "head chef."
- If need be, tell the instructor "I've got this, let me do it."
- Take things slow. Slow is smooth, and smooth is fast.
- Be efficient. Try to predict the next thing that'll need to get done, and get started on it.
- Keep chit-chat to a minimum!! If it's not about the rescue at-hand, keep quiet! Someone's life depends on you, so be quiet, patient, and focus on listening for instructions.
- Keep communication short. The subject & attendant don't care about the details of how, all they care about is how it affects them. For example, just say "You're going down 1 foot" or "You're going up 5 feet."
- Speak loudly. If you didn't get someone’s full attention the first time you said it, that's your fault, you're doing it wrong.
- "Stop!" If anyone says "stop," everyone echoes "stop!!" loudly. After that, only the controller asks "Why stop?"
My Teaching Notes
These are my notes, reminding me what topics to cover and in what order. You don't have to read or understand any of this yet, but I'm putting it out there in case you're curious: https://www.dropbox.com/s/i2vz5xb9hx13va7/Rescue%20Methods%20Teaching%20Notes.rtf?dl=0
Also, here's a document Deling put together trying to explain some of the technical skills, but I'd recommend NOT reading it for now, these are a lot easier to understand when you see them done in person: https://onedrive.live.com/view.aspx?cid=03CCD771C4BCF932&resid=3CCD771C4BCF932%218713
Practice at home
This is a bit complicated, so if it doesn't make sense, don't worry and we'll practice it together at the clubhouse. But, if you can, try to build a load-releasing hitch (LRH) at home to get some practice ahead of time. You need a cordelette and two lockers, at least one big enough for a munter hitch. Here's a video: https://www.youtube.com/watch?v=mvMU_fLJwqY
- Hang the larger locker somewhere so you don't have to hold it later. (On an eye-level bolt, or on your refrigerator's door handle, etc.)
- Stretch out the cordelette. Find the cordelette's knot, then find the point farthest from the knot. Clip the smaller locker there.
- About 9 to 12 inches away from the smaller locker, tie a munter-hitch on the larger carabiner. Treat the two strands of the cordelette as if they're one, just like when you set up a munter-rappel.
- Take the long tails and wrap them, at least four times.
- To tie it all off, push a bight between the two strands to prevent unraveling, and then finish it by using that bight to tie a big overhand around everything.
- Clip this nicely packaged LRH to the back of your harness until you need to use it.
- When you do use it, clip the munter-end to the anchor, so the munter will be stationary rather than moving when you go to release it.
Small Party Self-Rescue
I remember when I first took Intermediate Rescue Methods, I mistakenly thought I was going to learn to rescue someone on my own (i.e. only 1 rescuer available, often referred to as "small party self-rescue.") It turns out that doing so is really really complicated, much more so than what we'll cover, and it's well beyond the scope of the Intermediate curriculum. If you want to learn that, get through Intermediate Rescue Methods first, accepting the large-group basis of the scenarios, and then we can talk about possibly putting some optional practice nights together for small party self-rescue, if you really want to. Be aware that most people who do learn small party self-rescue end up simply vowing to never climb with fewer than three people ever again.
I remember when I first took Intermediate Rescue Methods, I mistakenly thought I was going to learn to rescue someone on my own (i.e. only 1 rescuer available, often referred to as "small party self-rescue.") It turns out that doing so is really really complicated, much more so than what we'll cover, and it's well beyond the scope of the Intermediate curriculum. If you want to learn that, get through Intermediate Rescue Methods first, accepting the large-group basis of the scenarios, and then we can talk about possibly putting some optional practice nights together for small party self-rescue, if you really want to. Be aware that most people who do learn small party self-rescue end up simply vowing to never climb with fewer than three people ever again.
Top picture: The northern Picket Range above Luna Cirque, 7/29/2013
