Alpine Ice vs Water Ice
It's kinda like the difference between alpine rock climbing and cragging. Remember that we're preparing you for is alpine ice, not necessarily water ice. A lot of the skills are transferrable, and you could definitely go climb some waterfalls (I encourage you to find ones you can top-rope) with your alpine ice equipment if you wanted to, but don't feel like you have to! Climbing waterfalls is not expected of you at any point within the Intermediate course.
Ice Climbing vs Rock Climbing
You should definitely be comfortable with the all the skills required for multipitch rock climbing before you start ice climbing. Passing Rock 2 is required in the Mountaineers, but I'd strongly recommend having climbed a few multipitch rock routes more than just Rock 2, so that the rope management and belay transitions are approaching second nature. After that though, ice climbing is still not rock climbing, and this is why.
=======
Okay okay, all of that scary safety lecturing aside, lets get into how climbing alpine ice is actually done!
Moving on the Ice
Moving on ice is really easy. Moving on ice while expending the minimum amount of energy, so you don't fatigue, is where the challenge lies. Here's a long video (completely optional if you want to watch it) with good advice on how to move on ice: https://www.youtube.com/watch?v=RHqmCsGZpnY
Multipitch Belay-Anchors on Ice
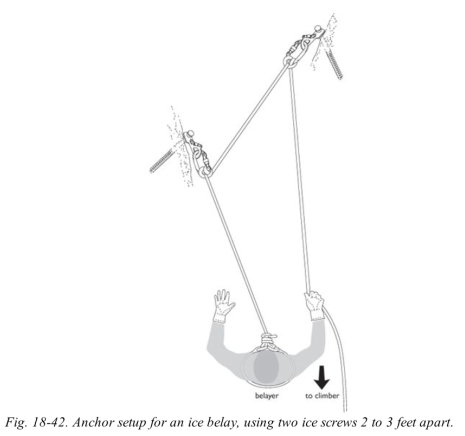
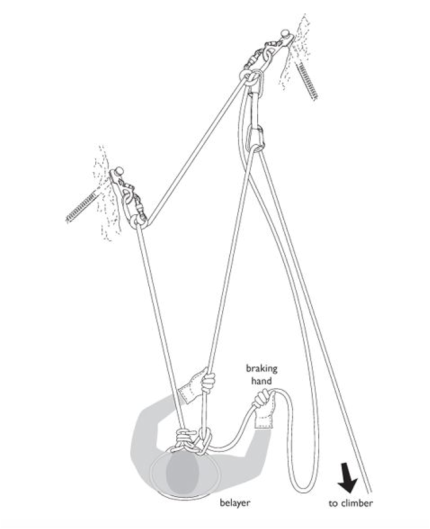
So far on rock climbs, we've taught you to almost-always build anchors with three gear placements, and a cordelette rigging them together. If you remember back to ropes and anchors, that's not the only SERENE anchor option. On ice, swinging leads is assumed, efficiency of building/tearing-down the anchor is highly valued, and the trust in a single ice screw placement is greater than a single nut placement (good ice can be extremely strong, there's less chance of human error at screwing in a screw than positioning something in odd-shaped rock crack, and a screw isn't going to get "jostled out" like a nut might.) So, we build a different SERENE anchor. Two ice screws, clove-hitching the rope into both of them with locking carabiners, and you're done. The screws are Solid, it's very Efficient, it is Redundant even if there's just two not three. As for Equalization, we intentionally opt not to equalize ice anchors. It's best if one screw is under load, and the other is not. A loaded screw puts pressure on the ice, which generates a tiny amount of heat, which weakens the screw. By keeping load off of one screw, at least one is not being weakened while the belayer hangs off the anchor. To achieve No Extension, it's best if one screw is placed high, and one is low. With the rope clove-hitched directly to both screws in the correct order, a failure of the lower screw means the load is immediately held by the upper screw, with no extension. See the attached pictures from Freedom of the Hills. Also, watch this video: https://vimeo.com/80485814 (They use twin ropes in that video, which is okay, but we'll usually still just use a single-rope.) The Mountaineers-official way to belay a follower on a pitch of ice is not using your device's autoblocking "guide mode" off the anchor like we usually do for rock. Instead, belay the follower off of your harness's belay loop, but redirect the belay via a single alpine-draw clipped to the higher ice screw of the belay anchor. (See the other attached picture from Freedom of the Hills.)
Gear for Alpine Ice
Read what I wrote about an ice tool & crampons in my advice about gear for Intermediate here: (scroll to the very bottom) https://www.dropbox.com/s/4al5e9xmt5hlx62/Rob%27s_Mountaineers_Intermediate_Gear.rtf?dl=0
Remember that since we're talking about alpine ice, the alpine environment is going to throw a variety of conditions at you, so the ice axe & crampons you have with you need to work on snowfields as well, not just straight-up ice. That means an ice axe where you can still plunge the shaft vertically to self-belay on snow, and crampons with horizontal front-points so they have a chance of holding in snow, rather than slicing through snow as vertical front points would.
Ice Screws
For ice screws: on glacial ice, longer is better, so I'd recommend mostly screws in the 19cm to 22cm range. Glacial ice doesn't always form the super hard ice-cube-out-of-the-freezer style ice (which is clear, glassy, or sometimes blue,) sometimes it's a little more granular (opaque, white, or dirty looking,) like a really really hard old snowfield, so the ice screw acts like a small picket in that stuff. There's some advice out there encouraging people the angle the head of ice screws towards the direction of pull slightly. While that does yield higher slightly strength placements on high-quality waterfall ice (the clear glassy stuff,) you should NOT angle the head of ice screws towards the direction of pull in glacial ice (because the ice screw is somewhat acting like a picket in that weaker ice, and you obviously would not angle a picket towards the direction of pull.) Keep it simple, and place the ice screw straight into the slow, exactly 90° from the direction it'll be loaded, not angled towards or away from the load.
For the Ice 1 and Ice 2 FTs, I'd recommend bringing 4 ice screws per person. If you're on a limited budget, 3 is okay, and 2 is the very bare minimum. Also bring one alpine-draw for each ice screw you bring. We'll go through the motions of swinging leads, but we'll use a low-angle portion of the glacier. You'll get paired with one other person. So, if you bring 4 ice screws and they bring 4 ice screws, you'll have a total of eight. Two ice screws will be used for each belay anchor, leaving 4 ice screws available for the climber leading the pitch to place as leader-pro. If you bring fewer screws, then you have less leader-pro.
Rappel Anchors on Ice
That same video I linked to earlier shows how to build V-threads really well. Here's that link again: https://vimeo.com/80485814 For Ice 1 and Ice 2, you'll need to bring a V-thread tool. I've used both a cut-up wire coat hanger, and the commercial "Petzl Multihook." Honestly, the coat hanger worked better, it was longer, and since the end wasn't a perfectly clean cut, some metal spurs act like barbs, and it really grabbed the accessory cord. The Petzl Multihook was okay, but it wasn't quite long enough for a V-thread drilled with a 22cm screw, which defeats the whole purpose in my mind. There are other commercial V-thread tools out there, so maybe a different model would work better. Also make sure you bring one or two pieces of 7mm cord for practicing V-threads. 4-feet in length minimum. 5-foot chunks of cord might even be better, leaving you more room to tie the knot, and reducing the V-angle of the cord coming out of the V-thread.
What I learned from Ice 1
I wanted to share the biggest thing I learned from the Mountaineers Ice FTs: dress to get wet. (It seems obvious to me now, but I didn't think about it before my first time.) Lots of little ice pieces with break off and fly everywhere when you swing the ice tool, and then melt if they get lodged in your clothing. I'll be wearing rain pants and my rain shell jacket, with all the pockets zipped up before I start climbing. Bring 3 or so pairs of gloves, so you can change into a dry pair after they get wet. A tip I learned from Meredith: buy some of those big yellow dishwashing gloves from any grocery store in size XL, then slip them over your liner gloves so you've got some insulation underneath them. Those yellow dishwashing gloves have great grip, and they're more waterproof than anything sold at any mountaineering store, they're just not insulated. You'll want eye protection of some sort. Sunglasses are fine, ski goggles could be awesome because ice bits won't find their way inside them around the edges. Being out on the lower Coleman glacier in the summer is actually quite hot. Bring lots of sunscreen, and drink lots of water. You could bring a steripen or pump filter, since there's a lot of little water channels running on top of the glacial ice during the summer, and that ice cold water tastes so good.
Further Reading
It's kinda like the difference between alpine rock climbing and cragging. Remember that we're preparing you for is alpine ice, not necessarily water ice. A lot of the skills are transferrable, and you could definitely go climb some waterfalls (I encourage you to find ones you can top-rope) with your alpine ice equipment if you wanted to, but don't feel like you have to! Climbing waterfalls is not expected of you at any point within the Intermediate course.
- Alpine rock climbing has longer approaches, longer routes, might have a 5.5 crux, with long sections of just scrambling possibly mixed in mid climb, so efficiency at managing the protection system, and the ability to move quickly through easy sections of the climb, are all key to being done before the sun goes down.
- Cragging rock climbs have shorter approaches, routes may be anywhere from single-pitch quickies to multi-pitch giants, but either way they're often pretty vertical and often have harder moves and more sustained climbing than what you might attempt in the alpine.
- Alpine ice has long approaches, & long routes. The ice is usually formed from compacted and aged snow, and it less than vertical. Many alpine ice routes are steep, icy sections of a glacier (say, a 65° angle) where self-arrest would be impossible, so we turn it into a pitched-out climb for safety.
- Water ice is more like what you see on magazine covers, where a waterfall has frozen to create a beautiful and often complex vertical pillar of ice. The verticality of it makes it much more strenuous to climb. Approaches are often on the shorter side, like cragging.
Ice Climbing vs Rock Climbing
You should definitely be comfortable with the all the skills required for multipitch rock climbing before you start ice climbing. Passing Rock 2 is required in the Mountaineers, but I'd strongly recommend having climbed a few multipitch rock routes more than just Rock 2, so that the rope management and belay transitions are approaching second nature. After that though, ice climbing is still not rock climbing, and this is why.
- Falling is not okay while ice climbing. Ever. While I've certainly tested gravity more times than I can remember while rock climbing (especially on bolted sport routes, but also occasionally on trad gear,) ice climbing is different because of all the sharp objects attached to you. If you get smacked by a cam on your rack, you get a bruise. If you get smacked by the pick of your ice tool falling with you, it's bad news. Even on top-rope, it's possible to catch a crampon point during an otherwise-minor fall, and wrench your ankle in a very bad way. So, climb within your limit, make moves where you *know* you won't fall (just like you do when you ascend steep snow unroped,) but then protect it anyway so that if something really unlucky happens you get to go to the emergency room instead of the coroner's office.
- Falling ice is normal. On rock climbs, falling rock is rare, and you have a right to be furious with anyone who trundles down a stone from a rock route. On ice routes, there are constantly going to be chunks of ice raining down. It's normal, so instead it's everyone's responsibility to carefully position so the fall-line and people below do not line up. This is trickiest with respect to the belayer, who may be tied in to an anchor. Before each pitch, make sure the belayer is positioned well to the side of the pitch, well out of the future fall-line that will happen as the next pitch is climbed. On multipitch climbs, that means the leader must think about this at the end of each pitch, and go off-route to the side a bit before building the anchor that ends the pitch.
- The medium we're climbing on is always changing. Unlike a rock climb, an ice route will be different every year. Also unlike a rock climb, it's best if you can complete the whole route while conditions are consistently cool out, i.e. before the heat of the day that afternoon. Fortunately, this is a bit less of a concern with alpine ice and glacial ice than it would be if you were getting into water ice climbing.
=======
Okay okay, all of that scary safety lecturing aside, lets get into how climbing alpine ice is actually done!
Moving on the Ice
Moving on ice is really easy. Moving on ice while expending the minimum amount of energy, so you don't fatigue, is where the challenge lies. Here's a long video (completely optional if you want to watch it) with good advice on how to move on ice: https://www.youtube.com/watch?v=RHqmCsGZpnY
Multipitch Belay-Anchors on Ice
So far on rock climbs, we've taught you to almost-always build anchors with three gear placements, and a cordelette rigging them together. If you remember back to ropes and anchors, that's not the only SERENE anchor option. On ice, swinging leads is assumed, efficiency of building/tearing-down the anchor is highly valued, and the trust in a single ice screw placement is greater than a single nut placement (good ice can be extremely strong, there's less chance of human error at screwing in a screw than positioning something in odd-shaped rock crack, and a screw isn't going to get "jostled out" like a nut might.) So, we build a different SERENE anchor. Two ice screws, clove-hitching the rope into both of them with locking carabiners, and you're done. The screws are Solid, it's very Efficient, it is Redundant even if there's just two not three. As for Equalization, we intentionally opt not to equalize ice anchors. It's best if one screw is under load, and the other is not. A loaded screw puts pressure on the ice, which generates a tiny amount of heat, which weakens the screw. By keeping load off of one screw, at least one is not being weakened while the belayer hangs off the anchor. To achieve No Extension, it's best if one screw is placed high, and one is low. With the rope clove-hitched directly to both screws in the correct order, a failure of the lower screw means the load is immediately held by the upper screw, with no extension. See the attached pictures from Freedom of the Hills. Also, watch this video: https://vimeo.com/80485814 (They use twin ropes in that video, which is okay, but we'll usually still just use a single-rope.) The Mountaineers-official way to belay a follower on a pitch of ice is not using your device's autoblocking "guide mode" off the anchor like we usually do for rock. Instead, belay the follower off of your harness's belay loop, but redirect the belay via a single alpine-draw clipped to the higher ice screw of the belay anchor. (See the other attached picture from Freedom of the Hills.)
Gear for Alpine Ice
Read what I wrote about an ice tool & crampons in my advice about gear for Intermediate here: (scroll to the very bottom) https://www.dropbox.com/s/4al5e9xmt5hlx62/Rob%27s_Mountaineers_Intermediate_Gear.rtf?dl=0
Remember that since we're talking about alpine ice, the alpine environment is going to throw a variety of conditions at you, so the ice axe & crampons you have with you need to work on snowfields as well, not just straight-up ice. That means an ice axe where you can still plunge the shaft vertically to self-belay on snow, and crampons with horizontal front-points so they have a chance of holding in snow, rather than slicing through snow as vertical front points would.
Ice Screws
For ice screws: on glacial ice, longer is better, so I'd recommend mostly screws in the 19cm to 22cm range. Glacial ice doesn't always form the super hard ice-cube-out-of-the-freezer style ice (which is clear, glassy, or sometimes blue,) sometimes it's a little more granular (opaque, white, or dirty looking,) like a really really hard old snowfield, so the ice screw acts like a small picket in that stuff. There's some advice out there encouraging people the angle the head of ice screws towards the direction of pull slightly. While that does yield higher slightly strength placements on high-quality waterfall ice (the clear glassy stuff,) you should NOT angle the head of ice screws towards the direction of pull in glacial ice (because the ice screw is somewhat acting like a picket in that weaker ice, and you obviously would not angle a picket towards the direction of pull.) Keep it simple, and place the ice screw straight into the slow, exactly 90° from the direction it'll be loaded, not angled towards or away from the load.
For the Ice 1 and Ice 2 FTs, I'd recommend bringing 4 ice screws per person. If you're on a limited budget, 3 is okay, and 2 is the very bare minimum. Also bring one alpine-draw for each ice screw you bring. We'll go through the motions of swinging leads, but we'll use a low-angle portion of the glacier. You'll get paired with one other person. So, if you bring 4 ice screws and they bring 4 ice screws, you'll have a total of eight. Two ice screws will be used for each belay anchor, leaving 4 ice screws available for the climber leading the pitch to place as leader-pro. If you bring fewer screws, then you have less leader-pro.
Rappel Anchors on Ice
That same video I linked to earlier shows how to build V-threads really well. Here's that link again: https://vimeo.com/80485814 For Ice 1 and Ice 2, you'll need to bring a V-thread tool. I've used both a cut-up wire coat hanger, and the commercial "Petzl Multihook." Honestly, the coat hanger worked better, it was longer, and since the end wasn't a perfectly clean cut, some metal spurs act like barbs, and it really grabbed the accessory cord. The Petzl Multihook was okay, but it wasn't quite long enough for a V-thread drilled with a 22cm screw, which defeats the whole purpose in my mind. There are other commercial V-thread tools out there, so maybe a different model would work better. Also make sure you bring one or two pieces of 7mm cord for practicing V-threads. 4-feet in length minimum. 5-foot chunks of cord might even be better, leaving you more room to tie the knot, and reducing the V-angle of the cord coming out of the V-thread.
What I learned from Ice 1
I wanted to share the biggest thing I learned from the Mountaineers Ice FTs: dress to get wet. (It seems obvious to me now, but I didn't think about it before my first time.) Lots of little ice pieces with break off and fly everywhere when you swing the ice tool, and then melt if they get lodged in your clothing. I'll be wearing rain pants and my rain shell jacket, with all the pockets zipped up before I start climbing. Bring 3 or so pairs of gloves, so you can change into a dry pair after they get wet. A tip I learned from Meredith: buy some of those big yellow dishwashing gloves from any grocery store in size XL, then slip them over your liner gloves so you've got some insulation underneath them. Those yellow dishwashing gloves have great grip, and they're more waterproof than anything sold at any mountaineering store, they're just not insulated. You'll want eye protection of some sort. Sunglasses are fine, ski goggles could be awesome because ice bits won't find their way inside them around the edges. Being out on the lower Coleman glacier in the summer is actually quite hot. Bring lots of sunscreen, and drink lots of water. You could bring a steripen or pump filter, since there's a lot of little water channels running on top of the glacial ice during the summer, and that ice cold water tastes so good.
Further Reading
- There's an Ice 1 FT handout that may be available to download from the "Course Materials" of the Intermediate course on Mountaineers.org. If it's not there, I'm sure you'll get sent one before your Ice 1 FT, or you can ask me to send you an old one.
- Freedom of the Hills Chapter 18. Maybe Chapter 19 too if you're curious.
- Will Gadd's book "Ice & Mixed Climbing: Modern Technique" is the best intro-to-ice-climbing book that I know of, it's worth picking up if you're looking for more info on a lot of this stuff. If anyone knows of a better book, please tell me, I'd be interested!
- This article by Will Gadd has some good info about the mindset necessary to approach ice climbing safely: http://willgadd.com/ice-climbing-is-not-rock-climbing/
- A video on gripping an ice tool: https://www.youtube.com/watch?v=ChNVI4eZ_k4
- A number of additional tips, but most are specific to water-ice climbing, not so much alpine-ice: https://www.youtube.com/watch?v=gZaYlJh7buY
- More tips: http://raphaelslawinski.blogspot.com/2010/12/and-keep-your-heels-down.html
a SERENE ice screw anchor
|

|
belaying a follower on ice
Top picture: A Mountaineers Ice 2 FT on Mt Baker's lower Coleman Glacier, 9/6/2014
