Skills on the Intermediate Eval
Coiling the Rope
Any method that produces a neat coil and allows you to wear the rope as if it was a backpack is acceptable. Personally though, I'm going to recommend you learn a totally different way to coil the rope, and that you learn it now. This way is not the Mountaineers-standard way of doing things, but it's better. Mostly, it's faster. Not at first, only after you get good at it. Also, by single-stacking the rope (starting at one end and coiling to the other, rather than starting from the middle,) it makes it much quicker to flake the rope for its next use. Here you go: https://www.youtube.com/watch?v=WfvioMwTVUo
Crevasse Rescue
https://www.youtube.com/watch?v=y6gz6WaO1_0
That excellent video shows crevasse rescue pretty much exactly the way it'll be expected to be done in the Eval. Some things to remember:
Belay Escape
Extended Rappel
https://vimeo.com/113362076
Backup Rappel Method
So that climbers aren't stranded when a belay device is accidentally dropped or forgotten, the Mountaineers always teach a backup plan. In recent years this has varied between the carabiner-brake rappel and the giant munter hitch rappel. You will be expected to know at least one backup rappel method (rappelling when you don't have a belay device) for the eval. The Mountaineers has bounced around a lot between three different "standards" in the last few years. During the eval, you'll only be evaluated on knowing one of them, your choice. I really would encourage you to know and practice all three so that you're able to safety-check someone else using any one of them. The three options:
Coiling the Rope
Any method that produces a neat coil and allows you to wear the rope as if it was a backpack is acceptable. Personally though, I'm going to recommend you learn a totally different way to coil the rope, and that you learn it now. This way is not the Mountaineers-standard way of doing things, but it's better. Mostly, it's faster. Not at first, only after you get good at it. Also, by single-stacking the rope (starting at one end and coiling to the other, rather than starting from the middle,) it makes it much quicker to flake the rope for its next use. Here you go: https://www.youtube.com/watch?v=WfvioMwTVUo
Crevasse Rescue
https://www.youtube.com/watch?v=y6gz6WaO1_0
That excellent video shows crevasse rescue pretty much exactly the way it'll be expected to be done in the Eval. Some things to remember:
- When establishing the initial anchor, make sure that you're at least five feet down-rope from the middle climber so that you immediately have enough slack to tie a figure-8-on-a-bight when the middle climber stands up. The video doesn't show this well, and I've seen a lot of students get in a pickle about this.
- The trickiest part is always rope management. Remember this rule: anything new that you add must go UNDERNEATH everything else. Adding a runner to an anchor-point? Make sure you thread it underneath any slack rope lying on the ground.
- The video shows a plunged ice axe for the initial anchor, and a deadman picket for the second/main anchor. On a real glacier, if I had two pickets available, I'd use both instead of the axe (one picket plunged vertical initially, and the deadman for the second/main.) In the field trip, we'll be using those fake ice axe heads on carpet boards, so that's what we'll practice with.
- There's a never-ending debate about "Should you build the second part of the anchor BEFORE or AFTER asking the middle person to get up?" The real answer this: both variations are right, you could definitely make a case for doing it either way, so make sure you accept it when someone does this differently than you do. (However, if you want my personal opinion: I'd much rather build both parts of the anchor, connect them and equalize them, before asking the middle person to ease out of self-arrest. Be aware that only works if you do not need their ice axe in order to complete your two-point anchor.)
- The method I teach doesn't use a single locking carabiner anywhere in the pulley system for the rescue. Lockers are still always required for personal anchors, though. Really, this doesn't matter that much. But, if you really can't stop thinking about it, more info here.
Belay Escape
- Update for November 2016: The fully-releasable version of belay escape (the variation with three mule knots) will continue to be expected on the Intermediate Eval this year, but to help you prepare, I made a video of it:: https://www.youtube.com/watch?v=fDtOdyCOe4o
- The main gotcha to watch out, in any variation, is failing to have your brake-hand fully closed at all the necessary times. While tying/untying the 1st mule knot, close the fingers of your left hand completely before opening your right. NEVER trust a prusik alone without a back up, and at times that backup is your hand on the belay's brake.
- Don't forget to communicate with your "climber" (even though this means talking to a sandbag.) Give them a heads up that they'll be lowered 6 inches BEFORE you let 6 inches of slack through. No one likes a surprise-lower.
- For another perspective, there's also this video: https://www.youtube.com/watch?v=wetMWQEbPC0
However, that video shows a variation that is NOT what's expected for this eval. Notice in the video that there are two times where she ties a figure-8-on-a-bight. The first is clipped into that bright blue prusik, and the second time is clipped to the anchor behind her. For the Intermediate Eval this year, both of those figure-8s will be replaced with a munter hitch tied off with a mule knot. - Here is an excellent step-by-step description for a similar version of belay escape: https://www.dropbox.com/s/akg8fc2qf8au91m/3%20Belay%20and%20Belay%20Escape%20checklist%2C%20from%20Claire%20Mitchell.pdf?dl=0
Extended Rappel
https://vimeo.com/113362076
Backup Rappel Method
So that climbers aren't stranded when a belay device is accidentally dropped or forgotten, the Mountaineers always teach a backup plan. In recent years this has varied between the carabiner-brake rappel and the giant munter hitch rappel. You will be expected to know at least one backup rappel method (rappelling when you don't have a belay device) for the eval. The Mountaineers has bounced around a lot between three different "standards" in the last few years. During the eval, you'll only be evaluated on knowing one of them, your choice. I really would encourage you to know and practice all three so that you're able to safety-check someone else using any one of them. The three options:
- Münter rappel. This video shows the correct set up: http://vimeo.com/34349494 The key to safety is to make sure three things are ALL on the same side: (i.e. either all left, or all right)
- the spine of the carabiner
- the break-strand coming out of the münter hitch, and
- the autoblock on your leg loop.
Also, do not extend munter rappels: münter hitches can put twists in the rope, causing it to twist around your rappel extension, possibly leading to dangerous nylon-on-nylon friction.
- Traditional carabiner brake rappel. See this page on it.
- The new 3-locker rappel. I believe this is what's going to be taught in Basic in 2017, so it's actually the most important to know, even though this may be the first time you're even hearing of it :) Pictures below. The pictures may be self-explanatory enough, you can just build one based on the picture. If you'd prefer written step-by-steps setup directions though, they're below too.
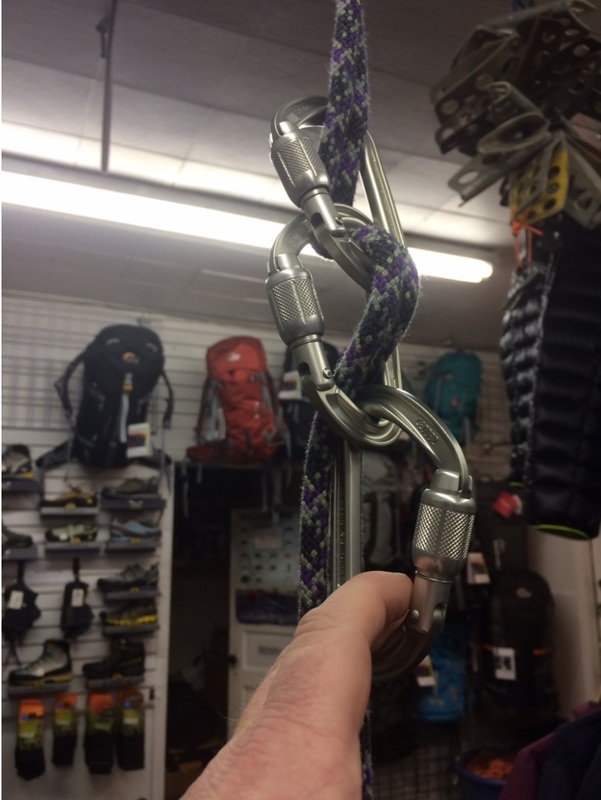
|
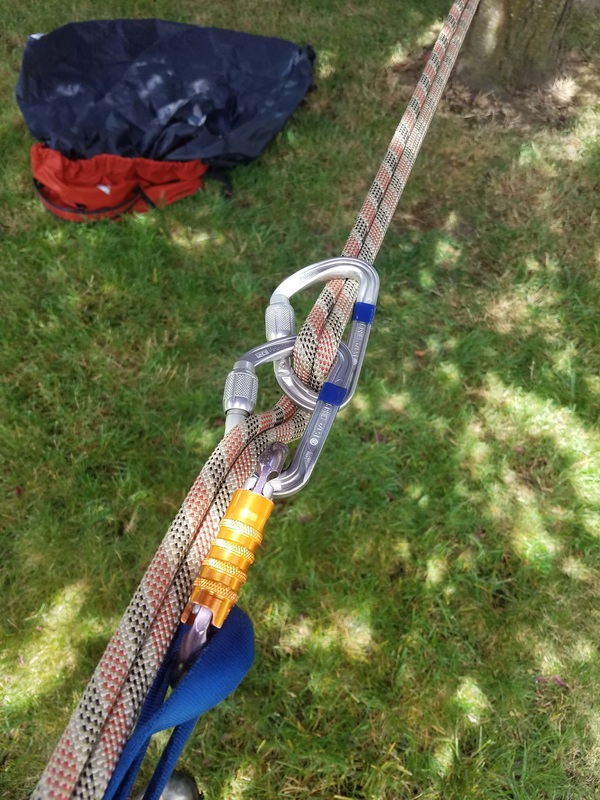
|
Photo credits: Jim Nelson, Heath Stewart
To build the new 3-locker rappel:
Proper Belay Technique
The Mountaineer's default way to belay (or at least the way we should teach new Basic students to belay) is the "PBUS" method, as opposed to the good old "slip-slap-slide" method that I tend to use. Here's a video showing taking in rope PBUS-style: https://www.youtube.com/watch?v=FCUJrXSKWrw (Although I cannot help but giggle at 4:08 in that video.)
Prusiking Out of a Crevasse
It's on the eval, but it's simple enough. This is an excellent video: https://www.youtube.com/watch?v=GWH3lnnl0ro
Navigation
If you've taken the Mountaineers-offered Navigation course, try to dig up that nav card they gave you to prove you took the class. If you can bring a valid nav card on the day of the eval, you can completely skip that section. During my 1st year, having a valid nav card also meant you weren't required to bring that USGS Snoqualmie Pass map that's in the field trip gear list. That should continue to be the case, but I'm not 100% sure on that.
SERENE
I think you all know this, but just to be sure, a good anchor is:
Strong/Solid
Efficient
Redundant
Equalized
No-Extension
You definitely do not need to watch (or understand) this whole video at this point, but if you want info, here it is: https://youtu.be/3SkCojauHto?t=40s
Other Info about Practice Nights
Gear
Obviously, bring everything you'd need to perform a belay escape and a crevasse rescue. Include the following if you can, but if you don't have everything for tonight, don't worry, we'll work it out:
Basement
You've all been to the clubhouse basement before, right? If not: To get to the basement, go into the main entrance of the clubhouse (through the glass doors into the lobby area) and turn right into the hallway that goes towards the bathrooms. One door left of the men’s bathroom leads to the skinny concrete stairway down into the basement. If the main entrance of the clubhouse is locked, go around the building to the downhill side and knock on the garage doors, we can let you in that way. Be sure to bring warm cloths. The basement is unheated, and some days it is literally the same temperature in there as it is outdoors.
- Clip the 1st locker to your belay loop. (Or to a PA, if extending the rappel.)
- Clip a 2nd locker to the 1st locker
- Take a 3rd locker, and push a bight of rope through it (like you were pushing rope through a regular belay device)
- Clip both the pushed through bight AND the brake-strand into the earlier 2nd locker.
Proper Belay Technique
The Mountaineer's default way to belay (or at least the way we should teach new Basic students to belay) is the "PBUS" method, as opposed to the good old "slip-slap-slide" method that I tend to use. Here's a video showing taking in rope PBUS-style: https://www.youtube.com/watch?v=FCUJrXSKWrw (Although I cannot help but giggle at 4:08 in that video.)
Prusiking Out of a Crevasse
It's on the eval, but it's simple enough. This is an excellent video: https://www.youtube.com/watch?v=GWH3lnnl0ro
Navigation
If you've taken the Mountaineers-offered Navigation course, try to dig up that nav card they gave you to prove you took the class. If you can bring a valid nav card on the day of the eval, you can completely skip that section. During my 1st year, having a valid nav card also meant you weren't required to bring that USGS Snoqualmie Pass map that's in the field trip gear list. That should continue to be the case, but I'm not 100% sure on that.
SERENE
I think you all know this, but just to be sure, a good anchor is:
Strong/Solid
Efficient
Redundant
Equalized
No-Extension
You definitely do not need to watch (or understand) this whole video at this point, but if you want info, here it is: https://youtu.be/3SkCojauHto?t=40s
Other Info about Practice Nights
Gear
Obviously, bring everything you'd need to perform a belay escape and a crevasse rescue. Include the following if you can, but if you don't have everything for tonight, don't worry, we'll work it out:
- a way to build a SERENE anchor on a pair of bolts. For example, a couple of spare carabiners plus a cordelette work really well, and I'll show you how once we get there. (21-ish feet of 7mm nylon cord is my recommended cordelette material)
- Here's how to do so with a double-runner: https://youtu.be/3SkCojauHto?t=22m12s
- Here's how to do so with a cordelette: https://youtu.be/3SkCojauHto?t=25m31s
- 5 locking carabiners, 3 of which are wide enough on top for a munter hitch.
- Your texas prusik set for glacier travel: the foot-loop prusik and the waist-prusik (I'm on a mission to kill the term "chest prusik," and replace it with the less confusing name "waist prusik")
- your ice axe (a necessary prop when going through the motions of crevasse rescue)
- a picket, if you own one already
Basement
You've all been to the clubhouse basement before, right? If not: To get to the basement, go into the main entrance of the clubhouse (through the glass doors into the lobby area) and turn right into the hallway that goes towards the bathrooms. One door left of the men’s bathroom leads to the skinny concrete stairway down into the basement. If the main entrance of the clubhouse is locked, go around the building to the downhill side and knock on the garage doors, we can let you in that way. Be sure to bring warm cloths. The basement is unheated, and some days it is literally the same temperature in there as it is outdoors.
Top picture: Heath Stewart rapping down the summit pyramid on Shuksan, 7/19/2015
