A few random thoughts on any winter activity:
- Avy danger assessment:
- Before you do anything in the winter, take an AIARE Level 1 course!!! It's so important, for both knowing what is and is not avalanche terrain in the first place (even if your only plan is to avoid it,) and for the discussion of human factors and how they affect decision making. It's worth retaking AIARE Level 1 every couple of years too, you'll understand it a little more deeply each time, and sometimes there are updates to what's taught.
- Use www.hillmap.com, it's awesome! In the top bar, click "Overlays", then click "Add Overlay", and choose "CalTopo Slope overlays" to get to color-code the map to show slope angle. Since avalanches are most likely when the angle of the terrain is between 30° and 45°, you know that anything shaded orange or red is a potential avalanche location. I take a screenshot of this in the map area I'm going to, print it, put it in a gallon ziploc bag (which makes it waterproof but still readable without having to open the bag again,) and take it with me for the climb. Of course, take AIARE Level 1, and remember that slope-angle is just one piece of data feeding into your decision making. Slope angle alone neither guarantees that something is safe, nor does it guarantee that it is dangerous.
- Eating & drinking enough:
- Pack some of you water as hot at the start of the day. Replace a liter or two with tea, hot cocoa, hot cider, hot lemonade, etc. If I'm starting from home I put a full tea kettle on the stove first thing when my alarm goes off. A thermos is nice, but a bit heavy. A BPA-free Nalgene works too if you get a waterbottle parka, which isn't as insulating as a thermos, but it's lighter and larger than most thermoses. Later that day, even drinking lukewarm water will be far more pleasant than nearly frozen water when you're feeling nearly frozen yourself.
- Consider partially "drinking lunch." A sandwich sounds like a good idea while you're warm and in civilization, but once you're out there in the cold, many people are unwilling to stop and take even a few minutes to eat a sandwich. Instead, bring a brunch sandwich that you eat in the car as you arrive at the trailhead, so you start the day fueled. Then, in your pack, bring a big bottle of one of those "Naked" juices, they can contain hundreds of calories, and takes only seconds to chug down. There, no more chilly lunch break!
- On overnights:
- Liquid-fueled stoves are ideal (Like the MSR Whisperlite, or XGK) for reliably producing heat during cold temperatures. Canister stoves can work, (like Jetboil, or MSR Reactor,) but since the fuel canister contains a pressurized gas, the pressure inside becomes lower when the canister is cold, so the heat output of the stove may be significantly lower than normal. It helps to keep the canister warm. Keep it up off the snow, perhaps by using a spare shovel blade as a snow platform. It can help a little by getting a chemical hand-warmer packet started, then placing it beneath the canister. If you think far enough ahead, keep the next fuel canister inside your jacket for about an hour before it's needed.
- Also for overnights, I like to bring two sleeping pads: my regular inflatable thermarest, plus a really cheap closed-cell foam pad. When sleeping, sleep on both. When sitting around the camp-kitchen for meals, pull out the closed-cell foam one, and use it to cover the snow-bench that you're sitting on.
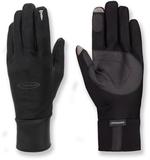
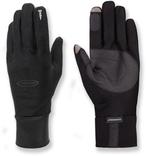
- Gloves:
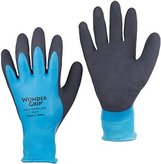
- Wish your gloves were more waterproof? Don't waste your money on "gore-tex lined" gloves, you'll be disappointed by how not-waterproof they end up being. Instead, you can buy rubber kitchen or gardening gloves in size XL and pull them on over your thin liner gloves, giving you both insulation and much better water resistance. Make sure the back of the glove is also rubber as much as possible, since exposed fabric will soak in water. I like the "Wondergrip" brand because they're more sticky than slippery when holding a shovel or ice tool handle.
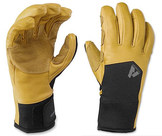
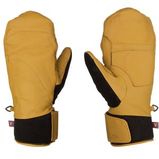
- On all trips, always bring at least three pairs of gloves or mittens, so you can swap to a fresh pair when one gets wet. For example, one or two pairs of thin liner gloves, maybe a pair of thicker gloves, and a pair of mittens. For all but the liner gloves, I'm a big fan of a mostly leather surface, they're good for belaying and they shed snow and moisture on the outside surprisingly well compared to synthetic fabrics.
|
|
|
|
|
Snow Shelters
If you take the Intermediate Winter Mountaineering field trip, I highly recommend you go with a leader who does it as an overnight, such that you get to sleep in an improvised snow shelter instead of a tent. The point of this exercise is to familiarize you with a reasonable way to survive an unplanned bivy during winter (or winter-like) conditions. Since unplanned bivies are (by definition) not planned when the day begins, the decision to build one rarely comes up more than an hour before sunset. There are many ways to build a snow shelter, and I'll leave it up to you to choose, and find a partner if you'd like to do a two-person shelter. Here are some options, Freedom of the Hills has info on these around page 51.
- A traditional snow crave --> making a T-shape tunnel sideways into a slope to form two sleeping platforms and a central walkway, then recreating the wall for the top-half of the T, and smoothing out the roof to be a dome. This could take a long time, but it could still be worth trying.
- Here's one video: https://www.youtube.com/watch?v=yAl0w62iqdE Although we don't have that guy's fancy curved saw, we can do the same thing with a regular saw and shovel, it'll just take us slightly longer.
- Although not a mountaineer, this survivalist guy gives a good demo: https://www.youtube.com/watch?v=cRqXqIFXcOs
- A trench covered with a tarp, like this or this. Laying horizontal poles down before the tarp create "rafters" or joists so the tarp doesn't dip inward. You can buy an 8'x10' blue tarp from any hardware store for about $20, and it only weighs 2.5 lbs, which isn't bad. Or you can bring, say, just the fly from one of your tents and use that as a tarp.
- An A-frame roof with snow blocks, like this or this. Trickier to build, and a snow saw is pretty important, but not nearly as time consuming as a true snow cave. Here's a good video.
WMFT Gear
Skim this list before going on the Intermediate Winter Mountaineering Field Trip to make sure you've packed everything:
Skim this list before going on the Intermediate Winter Mountaineering Field Trip to make sure you've packed everything:
- Technical gear:
- avy gear: beacon, probe, shovel (shovels must be aluminum)
- Helmet
- Crampons
- Ice Axe
- optional: an ice tool if you already own one, and would like to practice the the snow skills with it
- All of the gear you'd bring for a Basic glacier climb: harness, runners, carabiners, pulley, prusiks, etc.
- If we'll get to practice mixed climbing on top-rope, everyone should also bring a belay device, a cordelette, and 2 or 3 extra lockers, in order to help improvise good, redundant top-rope anchors
- picket (if you signed up to bring one)
- Clothing suitable for a winter climb, including:
- Mountaineering boots
- Gaiters
- Snowshoes
- 3 pairs (minimum) of gloves or mittens per person, so you can change to a dry pair when they get wet
- enough extra clothes in your pack such that if you get soaked through to your base-layer while constructing the snow-shelters, you don't have to sit through dinner or spend the night in any wet clothing
- another full change of dry cloths to leave in the car, for when we leave the field trip
- For snow-shelter building:
- a snow saw, if you have one (Ideally 1 for every 2 people)
- (optional but strongly encouraged) a tarp that’ll be used as part of the structure of snow-shelter roofs. If all else fails, the trench with a tarp roof is a foolproof shelter to build. The tarp can be a cheap blue 8'x10' tarp from any hardware store (those are about 2.5 lbs,) or perhaps just the rainfly from a tent.
- trekking-poles are recommended, even if you don't normally bring them, so you can use them in the types of snow-trenches we're building
- wands, flags, or some sort of marker if you want to build a snow cave and want to mark out the "no step" zone for your cave's roof
- optional: a small candle or two (like a tea-light) for your snow shelter (hollowing out an alcove for it in a wall somewhere)
- For sleeping:
- Sleeping bag. Synthetic is ideal, but down bags can work too as long as you're really careful about keeping it dry.
- Sleeping pad(s). I prefer to bring two: my regular inflatable Thermarest one, plus a cheap closed-cell foam on. During dinner, I use the foam one as a sit-pad.
- To keep sleeping bags dry, either bring a bivy bag (if you own one,) or bring a 2nd tarp that you can wrap around your sleeping bag like a burrito. (A spare footprint from a tent would work.)
- For dinner:
- Stove. (This is assumed to include stove, fuel, pot, lighter, and anything else required to melt snow and bring water to a boil.)
- Pump water filter. Useful for pulling melt-water out of a pot without waiting for it to come to a full boil.
- Bringing a dehydrated meal pack is the recommended dinner, for it's simplicity. You can do something more adventurous if you bring your own stove.
- Spoon
- 10 Essentials
- optional: a thermos with a hot beverage, to help you keep warm on Saturday
- optional: a few spare garbage bags, they're always handy for something
Top picture: Skiing the Haute Route in the Swiss Alps, 4/16/2015
